With the release of Sprout HR's new feature, Timesheet Lock, you're probably wondering where you can set this up on your account. By default, the Timesheet Lock is disabled and as such, it needs to be configured first before you can start using this. Curious as to what the Timesheet Lock is and how it's done? You can take a look at this article for a quick refresher before we start! Timesheet Locking
Now how can this be enabled? Keep on reading below!
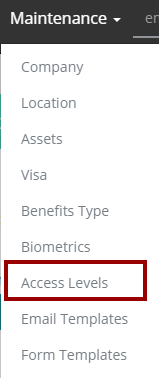
1. On your Sprout HR account, click the Maintenance menu.

2. Click the Access Levels sub-menu.

3. Select the level you wish to grant access to configure the Timesheet Lock setup.

4. Click the Navigation Access tab.

5. Scroll to the bottom until you see the Timesheet Lock section and tick the checkbox.

6. Once done, scroll back up and click Save.

7. Make sure that the changes were saved successfully.

There you have it! Once done, the user with the recently updated access level can now configure the duration as well as the other features of the Timesheet Lock
Related Articles: Timesheet Locking
If you have questions or comments, please feel free to reach out to us at experts@sprout.ph! We'd love to hear from you!
Comments
0 comments
Article is closed for comments.